Cotton Ball Stamped Star Craft – Easy 4th of July Kids Activity

James Stevens
Updated on July 07, 2026

Looking for a patriotic craft that’s genuinely easy to set up, fun for little hands, and ends up looking seriously impressive? This cotton ball stamped star is it.
Kids as young as 2 or 3 can do this activity with minimal help from you. There’s no complicated cutting, no brushes to wrestle with, and no paint-covered disaster to clean up afterward. Just a handful of simple supplies, a star template, and a whole lot of red, white, and blue fun.
Whether you’re planning a 4th of July party, a classroom activity for Independence Day, or a crafting afternoon before the fireworks – this one is a guaranteed hit.
Why Kids (and Parents!) Love This Craft
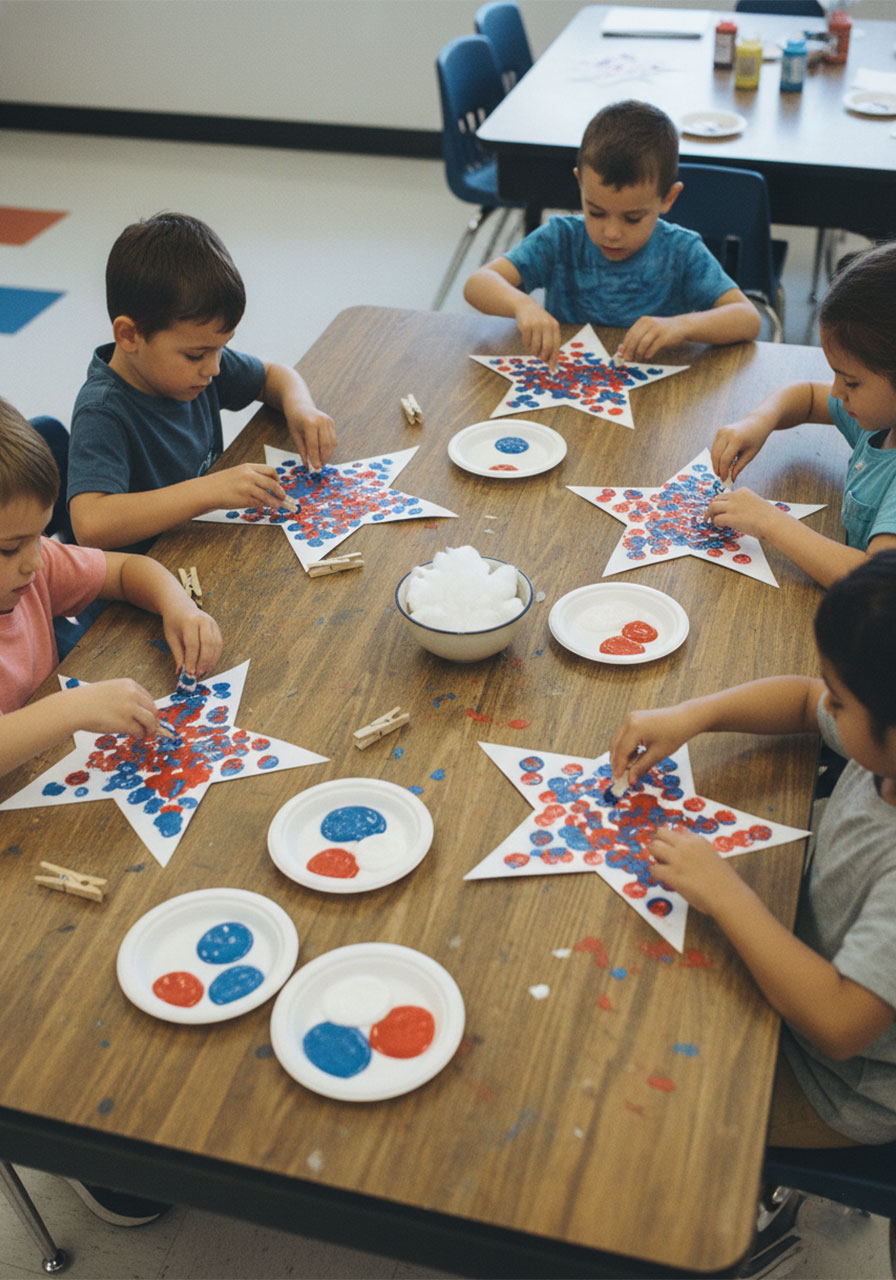
Here’s the thing about cotton ball stamping: it produces a beautifully textured, almost watercolor-like effect that looks like it took way more effort than it actually did. The fluffy cotton ball leaves behind these soft, blended splotches of red, white, and blue that overlap in the most gorgeous way.
When my daughter first saw her finished star, her exact words were “It looks like fireworks!” And honestly? She wasn’t wrong.
Beyond how it looks, there’s a real developmental benefit here too. Gripping the clothespin, dipping, and stamping builds fine motor skills. And alternating between colors helps younger kids practice focus and intentional decision-making. It’s art + learning, all wrapped up in a 20-minute activity.
It’s also the kind of craft that works in a big group. Planning a classroom activity? Set up a few paint stations and let kids rotate. Hosting a 4th of July party? Line up star cutouts on the table and let kids go to town while adults mingle.
What You’ll Need
White cardstock (one sheet per star)
Star template (print and cut, or freehand cut one)
Scissors
Red, white, and blue acrylic or washable paint
A paper plate (for your paint palette)
Cotton balls (a small handful per child)
Wooden clothespins (one per cotton ball)
Pro Tip: Use washable paint if you’re doing this with younger kids – it makes cleanup a breeze. Regular acrylic paint gives slightly richer color but can stain clothing, so throw on an old t-shirt or a craft apron first.
You can find wooden clothespins in bulk online or at your local craft store. They’re incredibly cheap and double as a built-in handle, keeping little fingers out of the paint (mostly 😄).

How to Make Your Cotton Ball Stamped Star
1. Download and print the star template.
Print it directly onto white cardstock for the best results – regular printer paper works too, but cardstock holds up much better once it gets wet from the paint.
2. Cut out the star.
Parents or teachers can pre-cut these ahead of time to speed things up. If your kids are old enough to use scissors safely, this is a great first step for them to own.
3. Set up your paint palette.
Squeeze a small dollop each of red, white, and blue paint onto a paper plate. Keep the colors separated so they don’t immediately muddy together – the blending will happen on the star itself, and it’s beautiful when it does.
4. Clip a cotton ball into the clothespin.
Open the clothespin, tuck one cotton ball firmly inside, and close it. This becomes your stamping “brush.” It’s surprisingly satisfying to use! Make one per color, or let kids switch between a single one (the colors will mix on the cotton ball over time, which creates a lovely blended effect).

5. Start stamping!
Dip the cotton ball lightly into one color of paint, then press and dab it onto the star cutout. Repeat, overlapping colors as you go. There’s no wrong way to do this – the more kids experiment with layering the colors, the better it looks. Encourage them to fill the whole star, right up to the edges.


6. Let it dry completely.
Give it at least 30–45 minutes before handling. Once dry, the colors are vibrant and the texture is gorgeous – almost like tie-dye.
Tip for Teachers: If you’re doing this as a class activity, pre-clipping cotton balls into clothespins the night before saves a ton of setup time on craft day.
How to Display or Use Your Finished Stars
These stars are too pretty to just tuck away in a folder! Here are a few fun ways to show them off:
String them up as a banner. Use twine or ribbon to hang a row of finished stars across a window, mantle, or classroom wall. It makes for the most adorable patriotic decoration – and kids love seeing their artwork on display.
Turn it into a card. Write a heartfelt message on the back and hand-deliver it to a veteran, family member, or neighbor who served. This is a beautiful way to pair the craft with a meaningful conversation about what Independence Day actually means.
Add it to a 4th of July centerpiece. Stick finished stars onto wooden skewers and arrange them in a vase or jar filled with small flags. Instant festive centerpiece, made entirely by your kids.
Create a patriotic collage. Make several stars in different sizes and arrange them on a larger piece of paper or poster board. Glue them down and write “Happy 4th of July” in the middle – instant wall art!

Fun Variations to Try
Once you’ve nailed the basic version, it’s easy to mix things up:
Try different shapes. The stamping technique works just as well on hearts, circles, or any other patriotic shape. Cut out a big number “4” for a fun Independence Day spin.
Go bigger. Print the star template at a larger size or trace around a bigger shape. Bigger canvas = more stamping fun and more dramatic results.
Add glitter. While the paint is still slightly wet, sprinkle a tiny bit of silver or gold glitter on top. It catches the light and looks absolutely magical once it dries.
Use sponges instead. If you don’t have cotton balls, small pieces of sponge clipped into clothespins work great too. They give a slightly different texture and are fun to compare side by side.
Let kids mix the colors. Give older kids a small empty section of the paper plate and encourage them to mix red + blue to make purple, or red + white to make pink. Talk about color mixing while you craft – it turns the activity into a mini art lesson!
Tips for Doing This With a Group
This craft is perfect for classrooms, summer camps, birthday parties, or any gathering where you have multiple kids to keep busy. Here’s how to make it run smoothly:
Set up stations in advance. Pre-cut the stars, pre-clip cotton balls, and portion out paint before kids arrive. The less setup there is in the moment, the smoother the whole activity flows.
Use trays or placemats. Line each workspace with a disposable placemat or sheet of newspaper. This keeps the paint contained and makes cleanup as simple as rolling up the paper and tossing it.
Have extra cotton balls ready. Kids will drop them, over-saturate them, or just want to try a fresh one. Keep a small bowl of extras at each station.
Don’t rush the drying. If you’re working with a group, set a drying area away from the craft table where kids can lay finished stars flat. A portable drying rack works great if you have one.
When to Use This Craft
This patriotic cotton ball stamped star is a perfect fit for:
🎆 4th of July parties – Set it up as a kids’ activity table while adults hang out nearby
🏫 Classroom Independence Day lessons – Pair it with a discussion about what the flag’s colors symbolize
🎖️ Veterans Day activities – Turn the finished stars into hand-delivered thank-you cards
🌸 Memorial Day get-togethers – A gentle, hands-on way to honor the day with young kids
🏕️ Summer camps and playgroups – Low mess, high engagement, totally replicable
No matter the occasion, the beauty of this craft is that it requires almost zero prior art skills. It looks great whether a 2-year-old makes it or a 10-year-old. Every single star comes out unique, colorful, and totally worth hanging up.
What to Say While You’re Crafting
One of the best things about doing a craft like this with kids is the conversation it naturally opens up. Here are a few simple talking points to weave in while you stamp away:
For younger kids (ages 2–5): Talk about the colors! “What color is that? Can you find the red paint? Let’s try blue now!” Keep it simple and playful.
For school-age kids (ages 6–10): Ask what they know about the 4th of July or the American flag. Talk about what the red, white, and blue stand for. Keep it age-appropriate and conversational – not a history lecture.
For older kids and teens: This can be a jumping-off point for a bigger discussion about patriotism, service, and gratitude. Ask open-ended questions: “What do you think it means to be proud of your country?” or “Do you know anyone who has served in the military?”
The craft itself only takes about 20 minutes. But the conversation you have around it? That can last a lifetime.
Ready to Make Your Patriotic Star?
Grab your supplies, download the star template, and get stamping! This is one of those activities where the process is just as fun as the result – and the result is something your kids will genuinely want to show off.
Made this with your class or your crew? We’d love to see it! Share your finished stars and tag us – there is nothing better than seeing a table full of gorgeous red, white, and blue stars made by little hands.
Because the best 4th of July memories aren’t just made at the fireworks show. Sometimes they happen right at your kitchen table, with paint on your fingers and a star you made all by yourself.
More 4th of July Ideas to Keep the Fun Rolling:
Post navigation

PlayPartyGame
Email:
Leave a Reply
Your email address will not be published. Required fields are marked *
Comment *
Name *
Email *
Website
